Beagleboard-XM kernel
有了x-loader,u-boot 接下來,剩下的就是kernel跟root file system。 這篇文章筆記了,怎麼製作kernel image。
首先先下載kernel source,我選了omap用的kernel source
http://muru.com/linux/omap/
git clone git://git.kernel.org/pub/scm/linux/kernel/git/tmlind/linux-omap.git linux-omap
cd linux-omap
接著去Build kernel
make ARCH=arm CROSS_COMPILE=arm-none-linux-gnueabi- distclean
make ARCH=arm CROSS_COMPILE=arm-none-linux-gnueabi- omap2plus_defconfig
make menuconfig時也許會缺少這個套件( sudo apt-get install libncurses5-dev)
make ARCH=arm CROSS_COMPILE=arm-none-linux-gnueabi- menuconfig
make ARCH=arm CROSS_COMPILE=arm-none-linux-gnueabi- uImage
build好的uImage會在arch/arm/boot/uImage 下,把uImage放到SD中。
接著製作一個給U-boot用的uEnv.txt,內容如下。
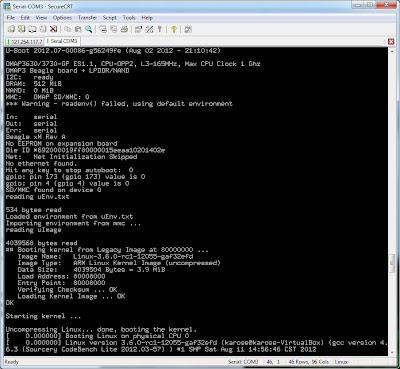
成功畫面如下。
首先先下載kernel source,我選了omap用的kernel source
http://muru.com/linux/omap/
git clone git://git.kernel.org/pub/scm/linux/kernel/git/tmlind/linux-omap.git linux-omap
cd linux-omap
接著去Build kernel
make ARCH=arm CROSS_COMPILE=arm-none-linux-gnueabi- distclean
make ARCH=arm CROSS_COMPILE=arm-none-linux-gnueabi- omap2plus_defconfig
make menuconfig時也許會缺少這個套件( sudo apt-get install libncurses5-dev)
make ARCH=arm CROSS_COMPILE=arm-none-linux-gnueabi- menuconfig
make ARCH=arm CROSS_COMPILE=arm-none-linux-gnueabi- uImage
build好的uImage會在arch/arm/boot/uImage 下,把uImage放到SD中。
接著製作一個給U-boot用的uEnv.txt,內容如下。
vram=12MB
defaultdisplay=dvi
dvimode=1280x720MR-16@60
kernel_file=uImage
boot=bootm


console=ttyO2,115200n8

mmcroot=/dev/mmcblk0p2 ro
mmcrootfstype=ext4 rootwait fixrtc

xyz_load_image=fatload mmc 0:1 0x80000000 uImage


mmcargs=setenv bootargs console=${console} ${optargs} vram=${vram} omapfb.mode=${defaultdisplay}:${dvimode} omapdss.def_disp=${defaultdisplay} root=${mmcroot} rootfstype=${mmcrootfstype} ${device_args}


optargs=console=tty0

loaduimage=fatload mmc 0:1 0x80000000 uImage; bootm 0x80000000;
成功畫面如下。


留言